Discover why your Aloe Vera root rot occurs and step-by-step solutions to restore its health, plus tips to prevent it from happening again.
Introduction
Noticing that your beloved Aloe Vera’s roots are looking less healthy than when you first brought it home can be concerning. Root rot is one of the most common issues indoor plant lovers face, especially with succulents like Aloe Vera. But don’t worry—this problem is usually fixable with some understanding and care.
In this guide, we’ll explore why is my Aloe Vera having root rot?, how to diagnose it correctly, effective treatment methods, and practical tips to keep your plant healthy in the future. With patience and proper care, your Aloe Vera can bounce back and flourish again.
Section 1: Understanding the Problem
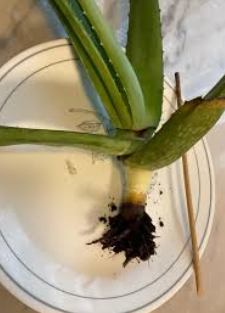
Visual Identification of Root Rot in Aloe Vera
Root rot in Aloe Vera often manifests through subtle yet critical signs. You might notice:
- Soft, brown, or black roots when you examine the plant’s base or after removing it from its pot.
- Roots that feel slimy or mushy under your touch.
- The plant's leaves may become yellow, wilted, or droopy, indicating internal distress.
- A foul smell emanating from the soil or roots. Tip: Always check roots gently when you notice any sudden decline in your Aloe Vera’s health.
Common Causes of Root Rot
Several factors contribute to root rot, but the main culprits are:
- Overwatering: Aloe Vera prefers dry conditions. Excess water leads to waterlogged soil, creating the perfect environment for fungi and bacteria.
- Poor drainage: Using a pot without drainage holes or soil that retains too much moisture traps unnecessary moisture around roots.
- Low light: Insufficient sunlight weakens your Aloe Vera, making it more susceptible to disease and poor health.
- Inappropriate soil: Heavy garden soil or non-porous mix retains water and discourages airflow to roots.
Section 2: Diagnosing the Exact Cause
Step-by-Step Process for Accurate Diagnosis
Understanding what caused your Aloe Vera’s root rot is essential for effective treatment. Follow these steps:
Cause 1: Excessive Watering Leading to Waterlogged Soil
- How to spot it: Check if the topsoil remains wet for days after watering. If so, overwatering is likely your issue.
- Signs: Soft, brown roots, moist soil that takes too long to dry out.
Cause 2: Poor Drainage or Compacted Soil
- How to tell: When repotting, notice if water sits on the surface or drains very slowly.
- Signs: Roots sitting in stagnant water, leading to decay.
Cause 3: Low Light Levels Weakening Plant Health
- How to tell: Your Aloe Vera might stretch out (etiolation), with elongated stems and dull color, indicating inadequate light.
How to Identify the Cause
- Observe watering habits and soil moisture.
- Check soil condition during repotting.
- Assess lighting conditions—is your Aloe Vera getting enough sunlight?
- Combining these observations will help pinpoint whether overwatering, poor drainage, or insufficient light is causing your root rot.
Section 3: Treatment Solutions
Immediate Actions to Save Your Aloe Vera
- Remove the plant carefully from its pot.
- Inspect and prune any soft, brown, or black roots using sterilized scissors or pruning shears.
- Clean your tools with rubbing alcohol or hot soapy water to prevent infection.
- Rinse roots gently to remove all decayed tissue.
- Repot in fresh, well-draining soil—preferably a cactus or succulent mix with sand or perlite.
Chemical and Natural Remedies
- Hydrogen peroxide soak: Mix one part 3% hydrogen peroxide with two parts water. Briefly soak the roots for about 5 minutes. This helps kill fungi and bacteria.
- Neem oil spray: Dilute neem oil according to package instructions and spray on the roots and soil surface. It has natural antifungal properties.
Long-term Treatment and Care Adjustments
- Adjust watering frequency: Only water when the soil is completely dry—every 3-4 weeks depending on humidity.
- Improve soil drainage: Use pots with drainage holes and mix in sand, perlite, or pumice.
- Provide plenty of light: Place your Aloe Vera in a sunny spot, ideally receiving at least 4-6 hours of indirect sunlight daily.
- Monitor environmental factors: Keep humidity low and avoid excessive watering.
Signs of Recovery
- New roots emerging
- Healthy, firm leaves
- Improved color and vitality
- No foul smell from soil
Section 4: Prevention Tips
Simple Practices to Avoid Root Rot
- Water only when soil is dry: Stick your finger about an inch into the soil; if dry, water lightly.
- Use well-draining soil and pots with drainage holes: This prevents excess water from pooling around roots.
- Monitor environmental factors: Ensure your Aloe Vera gets enough light and avoid high humidity.
- Routine check-ups: Regularly inspect roots and soil to catch early signs of problems before they worsen.
- Avoid over-fertilizing: Use a diluted cactus or succulent fertilizer during the growing season to promote healthy roots.
Conclusion
By understanding root rot, diagnosing its cause accurately, and applying targeted treatment, you can successfully revive your Aloe Vera. Remember, many plant issues are reversible when caught early and addressed with patience. Your Aloe Vera’s resilience is remarkable—with proper care, it can recover from root rot and continue to brighten your indoor space. Start by carefully diagnosing your plant, follow the treatment steps outlined, and implement preventive measures. Soon, your Aloe Vera will be thriving again, bringing its succulent charm back to your home.
FAQ
Q: How long until I see improvement after treatment?
A: Typically, you might start noticing signs of recovery within 2-4 weeks. New roots may begin forming, and leaf color should improve as the plant regains strength. Patience is key, as recovery from root rot can take some time depending on severity.
Q: Can my Aloe Vera fully recover from severe root rot?
A: Yes, with prompt and proper treatment, even severely affected Aloe Vera can recover. However, if the roots are extensively decayed or the plant shows no signs of new growth after several weeks, it could be challenging to save. Prevention and early detection are vital.
Q: Should I prune all the affected roots and leaves?
A: It's advisable to prune all visibly soft, brown, or black roots to prevent the spread of rot. Additionally, remove any yellow or damaged leaves to redirect energy to healthy parts. Sterilize your tools beforehand to minimize infection risk.
With a little love, patience, and care, your Aloe Vera can bounce back from root rot and continue to be a beautiful, low-maintenance addition to your indoor garden. Happy gardening!