Discover why your Calathea's leaves are sticky and how to fix it. If you're an indoor plant enthusiast, especially someone new to caring for Calatheas, noticing sticky leaves can be concerning. But don’t worry—this issue is often manageable with the right knowledge and care routines.
In this article, we'll explore the common causes of sticky leaves on Calathea plants, how to diagnose the problem accurately, effective treatment options, and proactive tips to keep your plant healthy and free from sticky residues in the future. Rest assured, with a bit of attentive care, your Calathea can thrive and beautify your indoor space once again.
Section 1: Understanding the Problem
Visual identification of sticky or shiny leaves
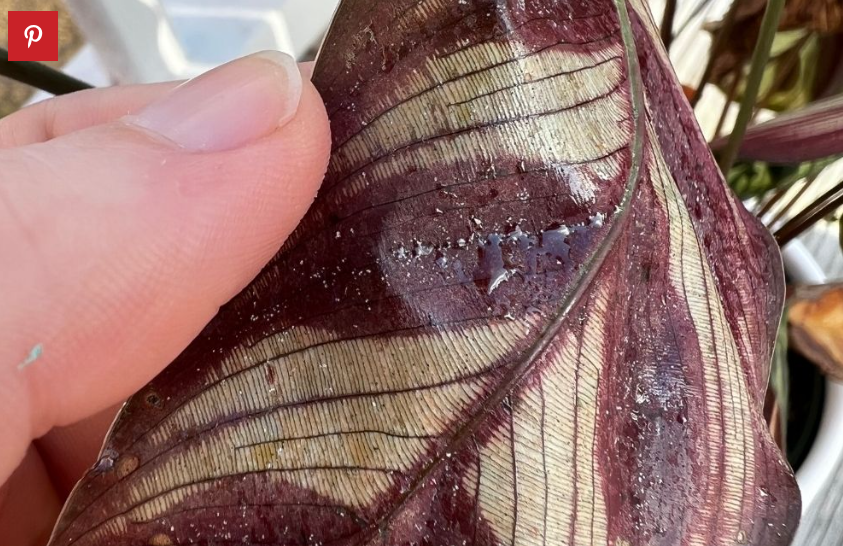
When your Calathea’s leaves start exhibiting a sticky or glossy surface, it’s easy to mistake it for healthy shine. However, if the stickiness feels excessive or is accompanied by a film-like appearance, it’s likely a sign that something unusual is happening. You might notice a shiny coating that collects dust, or a sticky residue that makes the leaves feel damp or tacky to the touch.
Common causes overview, such as pest activity, overwatering, or environmental factors
Several factors can cause sticky leaves on Calathea, but the most common culprits are pest infestations and environmental issues:
- Pest activity — insects like scale insects or aphids secrete sticky substances that leave residues.
- Overwatering — excessive moisture can promote fungal or bacterial growth, leading to a sticky, sometimes oozing appearance.
- Environmental factors — dust buildup, high humidity, or the use of certain sprays can cause a shiny film on leaves. Understanding the root cause is key to effective treatment and ensuring your Calathea remains healthy.
Section 2: Diagnosing the Exact Cause
Follow these steps to pinpoint the root of the sticky residue
Accurate diagnosis is essential before applying remedies. Here's how to identify what’s affecting your Calathea:
Cause 1: Sap-sucking pests like scale insects or aphids
- Inspect both sides of leaves carefully, using a magnifying glass if needed.
- Look for tiny bumps that may be brown, white, or yellow—these are often scale insects.
- Check for small, moving insects such as aphids, especially in new growth.
Cause 2: Excessive or improper watering leading to fungal or bacterial issues
- If the sticky residue appears after overwatering, it might be related to fungal exudates or bacterial ooze.
- Examine the soil for signs of sogginess, mold, or an unpleasant smell.
Cause 3: Environmental stress such as high humidity or dust buildup
- Dusty leaves can develop a shiny film that mimics stickiness.
- High humidity environments can cause condensation that leads to sticky or moldy spots.
How to tell which cause is affecting your plant (inspection tips, pest detection, etc.)
- Pest detection: Use a damp cloth to gently wipe the leaf surface—if you find small insects or residues, pests are likely involved.
- Examine soil and roots: Look for signs of fungal growth or rot.
- Environmental cues: Consider recent changes in humidity, watering habits, or cleaning routines. Accurate identification will guide your treatment plan and help prevent recurrence.
Section 3: Treatment Solutions
Apply specific remedies based on your diagnosis
Once you've identified the cause, follow these targeted actions:
Immediate actions: manual removal of pests, gentle cleaning of leaves
- Use a soft cloth or sponge with warm water to gently wipe the leaves.
- For pests, gently scrape or use a soft brush to dislodge insects.
Natural remedies: insecticidal soap, neem oil, or hydrogen peroxide solution
- Insecticidal soap or neem oil: Dilute as instructed and spray on affected areas—safe for most indoor plants.
- Hydrogen peroxide solution: Mix one part hydrogen peroxide with four parts water to help reduce fungal or bacterial residues. Spray lightly on affected leaves.
Chemical treatments: appropriate use of pesticides if necessary, always pet-safe
- If natural methods fail, consider using approved horticultural pesticides specifically labeled for indoor plants. Always read labels carefully to ensure safety, especially if you have pets.
Adjusting watering routines to prevent overwatering
- Water only when the top inch of soil feels dry.
- Ensure good drainage and avoid leaving excess water in the saucer.
Long-term care: maintaining healthy humidity, correct light, and consistent watering
- Calatheas thrive in high humidity—use a humidifier or regular misting.
- Place your plant in indirect, filtered light.
- Maintain consistent watering routines to prevent stress and fungal issues.
Section 4: Prevention Tips
Keep your Calathea healthy and free from sticky issues in the future
Prevention is always better than cure. Adopt these practices to keep your Calathea flourishing:
Regular inspections for pests and sticky residue
- Check your plant weekly, paying attention to undersides of leaves and stems.
- Clean leaves regularly to remove dust and prevent buildup.
Proper watering and humidity control practices
- Use well-draining soil and pots with drainage holes.
- Maintain humidity levels around 60-80% for optimal Calathea health.
Cleaning leaves frequently to prevent dust accumulation
- Wipe leaves with a damp cloth every couple of weeks to keep them clean and shiny without excess residue.
Quarantining new plants to prevent pest spread
- Isolate new or purchased plants for at least two weeks to monitor for pests before introducing them to your collection.
Using natural repellents or preventive sprays
- Neem oil sprays can act as a deterrent for pests when applied periodically.
Conclusion
Recognizing and addressing sticky leaves on your Calathea involves a combination of careful inspection, diagnosis, and prompt action. Whether pests, environmental stress, or watering habits are to blame, understanding the root cause allows you to choose the most effective treatment. With attentive care, your Calathea can recover beautifully, becoming a lush, vibrant addition to your indoor garden. Don’t forget to routinely check your plant, manage humidity wisely, and keep the leaves clean. Your dedicated efforts will ensure your Calathea remains healthy and free from sticky surprises—bringing joy and greenery into your home.
FAQ
Q: How long until I see improvements after treatment?
A: It typically takes about one to two weeks for noticeable improvements. Visible pest disappearance, decreased stickiness, and healthier leaf appearance are signs of recovery. Consistent care and follow-up inspections accelerate healing.
Q: Can my Calathea recover fully from sticky leaves?
A: Yes, most Calatheas can fully recover if the underlying cause is correctly identified and treated promptly. Removing pests, adjusting watering, and maintaining optimal humidity promote regrowth and restore plant health.
Q: Should I prune damaged or heavily affected leaves?
A: Yes, pruning heavily damaged or severely affected leaves can help the plant focus energy on healthy growth and prevent pest spread. Use clean scissors to trim close to the base, and dispose of the cuttings safely.
By understanding the causes behind sticky leaves and implementing the right care strategies, you can ensure your Calathea remains a stunning, healthy focal point in your indoor space. Happy planting!