Learn practical steps to identify, treat, and prevent black spots on Alocasia leaves. Keep your plant healthy with our expert care tips and remedies.
Introduction
Noticing black spots on your Alocasia can be worrying for any plant enthusiast. These unsightly marks often raise concerns about your plant’s health, but the good news is that black spots are a common issue with straightforward solutions. Whether caused by fungal infections, environmental stress, or pest issues, understanding the root cause is key to effective treatment. In this article, we'll guide you through how to fix Alocasia black spots—how to identify them, diagnose their cause, and implement simple yet effective remedies. With patience and proper care, your beloved Alocasia can recover and thrive once more.
Section 1: Understanding the Problem
Visual Identification: How to Recognize Black Spots and Their Distribution
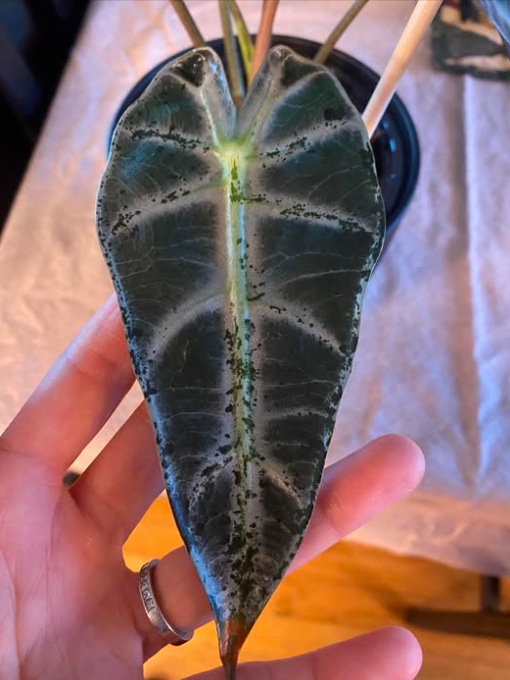
Black spots on Alocasia leaves can vary in size, shape, and distribution. Typically, they appear as:
- Small, round, or irregular black or dark brown lesions
- Spots may be scattered across the leaf surface or clustered
- They often have a dry, necrotic appearance with some surrounding yellowing or browning Pay attention to whether the spots are confined to certain areas or spread extensively. Noticing their pattern can help diagnose the underlying issue more accurately.
Common Causes Overview: Fungal Infections, Overwatering, Low Light, and Environmental Stress
Black spots generally originate from several common factors:
- Fungal Infections: Overwatering and humid conditions promote fungal growth, leading to leaf spots.
- Overwatering: Excess water can cause root rot, which manifests as black or necrotic spots on leaves.
- Low Light Conditions: Insufficient light jeopardizes plant immunity, making it prone to infections.
- Environmental Stress: Sudden temperature changes or drafts can damage tissues, resulting in necrosis. Understanding these causes sets a foundation for targeted treatment.
Section 2: Diagnosing the Exact Cause
Follow a Step-by-Step Process to Determine What Is Causing the Black Spots
Careful observation and diagnosis are essential. Here's how to do it:
Cause 1: Fungal Infection Due to Overwatering or High Humidity
- Signs: Soft, black spots with fuzzy or mold-like growth; other leaf parts may be slightly wet or sticky.
- Conditions: Persistent overwatering, high humidity, poor drainage.
Cause 2: Physical Damage or Injury Leading to Necrosis
- Signs: Black spots appearing where leaves have been physically bruised or cut.
- Conditions: Recent handling, moving, or accidental bumps.
Cause 3: Pest-Related Issues or Bacterial Infections
- Signs: Black spots accompanied by tiny insects, sticky residue, or other pests.
- Conditions: Visible pests like scale, spider mites, or bacterial streaks.
How to Tell Which Cause Applies to Your Plant
- Check the texture around the spots—fuzzy or moldy indicates fungal issues.
- Recall recent handling or injuries—spots near damaged tissue.
- Inspect the underside of leaves and stems for pests or bacterial signs.
- Evaluate watering habits and humidity levels.
Section 3: Treatment Solutions
Implement Targeted Remedies Based on the Diagnosed Cause to Help Your Plant Recover
Once you've identified the cause, follow these practical steps:
Immediate Actions: Remove Affected Leaves, Reduce Watering, Improve Airflow
- Prune infected leaves: Using sterilized tools, carefully cut away affected areas to prevent spread.
- Adjust watering: Let the soil dry out slightly between watering sessions.
- Enhance air circulation: Use a fan or place the plant where airflow is good to prevent fungal growth.
Using Natural Remedies: Neem Oil, Hydrogen Peroxide Solutions, and Proper Pruning
- Neem oil: Dilute according to package instructions and spray to suppress fungal pests.
- Hydrogen peroxide solution: Mix one part hydrogen peroxide (3%) with two parts water; lightly spray infected areas.
- Pruning: Remove severely affected leaves to reduce fungal spread and encourage healthy new growth.
Chemical Treatments: Fungicides Where Necessary
- If fungal infection persists, consider applying an appropriate fungicide, following label instructions carefully. Always prioritize natural remedies first to minimize chemical exposure, especially for indoor plants.
Monitoring Progress During Recovery
- Observe your plant regularly, watching for new spots or spread.
- Maintain consistent watering, proper lighting, and good hygiene.
Section 4: Prevention Tips
Prevent Future Black Spots and Keep Your Alocasia Healthy with Proper Care Practices
Prevention is always better than cure. Here are essential tips:
Adjust Watering Habits and Ensure Proper Drainage
- Water only when the top inch of soil feels dry.
- Use well-draining soil and pots with drainage holes to prevent water accumulation.
Maintain Optimal Humidity and Light Conditions
- Keep humidity levels moderate; mist occasionally or use a humidity tray if air is dry.
- Provide bright, indirect light—avoid direct sunlight that can scorch leaves.
Proper Hygiene: Cleaning Tools and Removing Problematic Leaves
- Always disinfect pruning shears between cuts to prevent disease transmission.
- Regularly remove fallen leaves or debris that may harbor pathogens.
Regular Inspection and Early Intervention
- Frequently check your Alocasia for early signs of trouble.
- Address issues promptly to prevent escalation.
Conclusion
Summary
Black spots on Alocasia leaves are a common issue but are often manageable with correct diagnosis and care. By understanding the causes—whether fungal, physical injury, pest-related, or environmental—you can apply targeted treatments to help your plant recover.
Encouragement
Don't be discouraged if your Alocasia develops black spots. With patience, consistent care, and preventive measures, most issues are fixable, and your plant can bounce back vibrant and healthy.
Next Steps
Follow our step-by-step guide to diagnose, treat, and prevent black spots, and enjoy your lush, healthy Alocasia once again. Remember, your attention and love are the best remedies!
FAQ
Q: How long until I see improvement after treatment?
A: Typically, with proper care, you can notice a reduction in black spots within a few weeks. New leaves should emerge healthy, and existing spots may fade or stop spreading within that period.
Q: Is it safe to prune infected leaves?
A: Yes, pruning infected leaves is recommended to prevent the spread of disease. Use sterilized tools and dispose of removed material away from your plant to avoid re-infection.
Q: Can I use household remedies to treat black spots?
A: Many household remedies, like diluted hydrogen peroxide or neem oil, are effective and safe for Alocasia. Avoid using harsh chemicals unless necessary, and always test solutions on a small leaf area first.
Keep caring for your Alocasia with patience and mindfulness, and it will reward you with gorgeous, lush foliage. Happy gardening!