Discover why your Calathea suffers from root rot, how to diagnose it, and effective treatments to restore your plant health with expert care tips.
Introduction
Noticing your Calathea’s roots are struggling? You're certainly not alone—root rot is a common issue among indoor plant enthusiasts, but the good news is, it’s totally manageable once you understand what’s happening. Many plant parents find themselves worried when their beloved Calathea’s health suddenly declines, especially when roots appear rotted or the plant shows signs of stress. This article will walk you through why Calathea root rot occurs, how to identify it correctly, and practical steps to treat and prevent it. With a little patience and proper care, your Calathea can bounce back, vibrant and healthy once again.
Section 1: Understanding Root Rot in Calathea
Visual Identification of Root Rot in Calathea
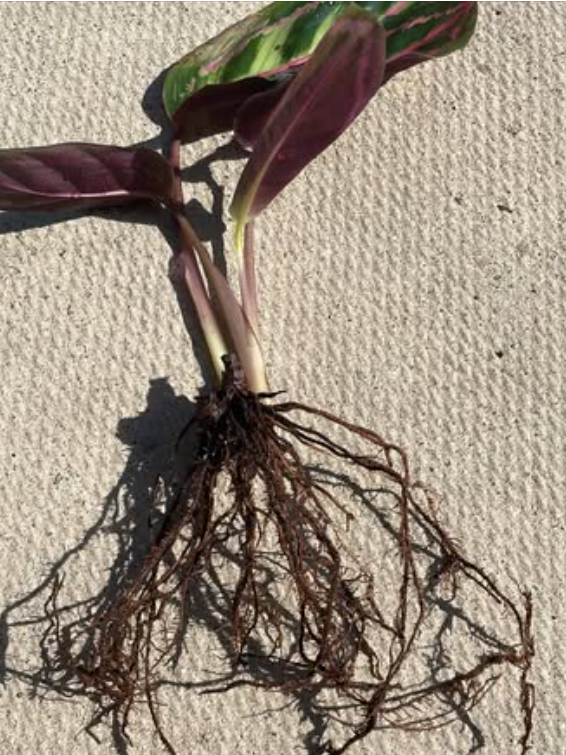
Root rot in Calathea manifests in various ways, often signaling that something’s wrong beneath the surface:
- Discolored, soft, or mushy roots: Healthy roots are firm and white or light tan. If they turn brown, black, or feel slimy, root rot might be setting in.
- Unusual wilting or yellowing leaves: The plant may appear droopy even after watering, indicating stress.
- Foul odor: A rotten smell emanating from the soil is a classic sign that roots are decaying.
- Stunted growth: The plant may stop growing or look unhealthy despite proper light and care.
Common Causes of Root Rot, Including Overwatering and Poor Drainage
Root rot primarily results from excess water in the soil, which deprives roots of oxygen and encourages fungal growth. Some common causes include:
- Overwatering: Too much watering frequency or deep watering can keep the soil perpetually wet.
- Poor drainage: Using heavy, compacted soil or containers without drainage holes traps excess water.
- Low light and temperature stress: Cold drafts or insufficient light weaken roots, making them more susceptible to rot.
- Infrequent repotting: Old, compacted soil can bind moisture and hinder proper drainage over time.
Section 2: Diagnosing the Exact Cause of Root Rot
A Step-by-step Guide to Diagnosing Whether Overwatering, Soil Issues, or Other Factors Are to Blame
To effectively treat and prevent root rot, first identify its root cause. Follow these steps:
Cause 1: Excess Watering Leading to Waterlogged Soil
- Check soil moisture: Insert your finger about an inch into the soil. If it's soggy and stays wet for days, overwatering is likely the culprit.
- Review watering habits: Do you water your Calathea more than once a week? If so, consider adjusting.
Cause 2: Poor Drainage or Compact Soil
- Inspect the pot: Are there drainage holes? Is the soil heavy or poorly aerated?
- Test drainage: Pour water into the pot and observe how quickly it drains. Slow drainage indicates poor soil or blocked holes.
Cause 3: Low Light or Temperature Stress Weakening Roots
- Assess light conditions: Calatheas prefer bright, indirect light. Insufficient light weakens the plant’s overall health, making roots vulnerable.
- Evaluate environment: Is the plant exposed to drafts or sudden temperature drops? Such stressors can compromise root vitality.
How to Tell Which Cause Applies to Your Plant
Combine these observations with your watering and environmental practices. For example, if the soil remains wet and drainage is poor, overwatering with poor drainage leads to root rot. If the plant is also in low light and has weak stems, environmental stress compounds the problem.
Section 3: Effective Treatment Strategies
Immediate Actions: Removing Affected Roots and Adjusting Watering Habits
- Carefully remove the Calathea from its pot: Gently extract the plant without damaging the roots.
- Inspect roots closely: Discard any roots that are black, brown, mushy, or foul-smelling.
- Sterilize your tools: Use clean shears or scissors, sterilized with rubbing alcohol, to cut away affected roots.
- Let the plant dry out: Allow the remaining healthy roots to sit for a few hours to callus over wounds.
- Adjust your watering routine: Water only when the top inch of soil is dry. Remember, Calathea prefers evenly moist but not waterlogged soil.
Long-term Recovery: Repotting in Well-draining Soil and Improving Environment
- Choose the right soil mix: Use a well-draining potting mix designed for houseplants, combining peat moss, perlite, and orchid bark.
- Select appropriate containers: Use pots with drainage holes to prevent water accumulation.
- Position your Calathea optimally: Place it in bright, indirect light and away from drafts.
- Increase humidity: Calatheas thrive in higher humidity; consider misting or using a humidifier.
Monitoring and Supporting Plant Recovery During Healing
- Observe aftermath: Keep an eye on new growth and leaf color.
- Avoid fertilizing immediately: Wait until the plant shows signs of recovery before reintroducing fertilizer.
- Maintain consistent watering: Stick to a routine that prevents over- or under-watering.
Section 4: Prevention Tips to Keep Your Calathea Healthy
Best Watering Practices: Bottom Watering and Checking Soil Moisture
- Bottom watering: Place the pot in a saucer of water for 15-30 minutes, allowing roots to absorb moisture without sitting in excess water.
- Use a moisture meter: Invest in a tool to accurately gauge soil moisture levels, preventing guesswork.
Ensuring Proper Drainage and Soil Mix Composition
- Mix lightweight, airy materials into your soil to promote drainage.
- Use containers with drainage holes for every watering.
Maintaining Optimal Humidity and Avoiding Overwatering
- Keep humidity levels above 50% with regular misting or humidifiers.
- Follow a consistent watering schedule based on soil moisture, not just calendar days.
Conclusion
Recap of Diagnosing Root Rot, Treatment Steps, and Preventive Care
In summary, why is my Calathea having root rot? Common causes include overwatering, poor drainage, and environmental stressors. Recognizing symptoms like mushy roots, foul smell, and leaf yellowing is crucial for early intervention. Effective treatment involves removing damaged roots, adjusting watering habits, repotting with well-draining soil, and creating an optimal environment. Prevention hinges on proper watering techniques, ensuring good soil drainage, and maintaining suitable humidity levels.
Encouragement
Remember, with attentive care and timely action, your Calathea can recover from root rot and flourish once again. Patience and consistency are key—trust in your plant's resilience!
Next Steps
Start by carefully inspecting your plant’s roots, then follow the recommended treatment steps. Adjust your watering routine and environment to prevent future issues. Your Calathea is counting on your care—happy gardening!
FAQ
Q: How long until I see improvements after treatment?
A: Typically, you can expect to see signs of recovery within 2-4 weeks, including new leaf growth or healthier stems. Be patient and consistent with your care routine.
Q: Can root rot ever fully heal, or is my plant lost?
A: If caught early and treated properly, many Calatheas can recover completely. However, if root rot has caused extensive damage, some parts may not heal, and propagation might be necessary to save the plant.
Q: Should I prune all the damaged roots or just the visibly affected ones?
A: Always prune only the affected roots, making clean cuts just above healthy tissue. Removing all rotted roots helps prevent further spread and encourages healthy new root growth.
Taking care of your Calathea might require extra attention if facing root rot, but with patience and proper treatment, your indoor jungle can be restored to health. Happy planting!