Noticing black spots on your Peace Lily can be quite alarming, especially if you're new to plant parenting. You might worry about your plant's health or feel unsure why this is happening. Rest assured, you're not alone—many plant enthusiasts encounter this issue at some point. The good news is that with a little knowledge and prompt action, you can help your Peace Lily recover and regain its lush, vibrant appearance. In this article, we'll guide you through understanding what causes black spots, how to accurately diagnose the problem, and what effective solutions and prevention tips you can follow. Your Peace Lily is resilient, and with proper care, it can bounce back healthier than ever.
Section 1: Understanding the Problem
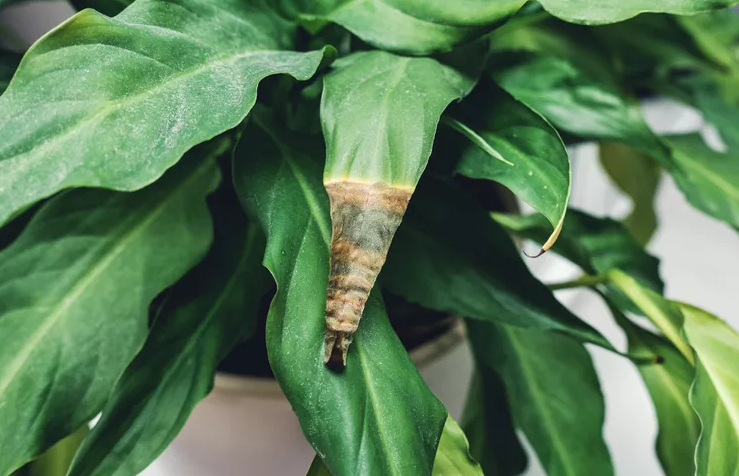
Visual identification: appearance, size, and location of black spots
Black spots on a Peace Lily typically appear as small, dark patches on the leaves, often concentrated at the edges or in spots across the surface. The size can range from tiny specks to larger, more conspicuous areas, sometimes with an irregular shape. These spots may initially look like smudges or stains but tend to deepen in color and may become necrotic over time. Frequently, you’ll notice them on older or lower leaves first, but they can appear anywhere on the plant.
Common causes overview: fungal infections, overwatering, low light, and pests
Several factors can lead to black spots on your Peace Lily:
- Fungal infections: Diseases like leaf spot fungi or Botrytis can cause black lesions on the leaves.
- Overwatering: Excess moisture promotes root rot and fungal growth, which can manifest as black spots.
- Low light conditions: Insufficient light weakens the plant's defenses, making it more susceptible to infections.
- Pests: Certain pests, such as fungal gnats or micro-pests, can cause physical damage or introduce pathogens resulting in black spots. Knowing these possibilities helps you narrow down the cause and choose the appropriate treatment.
Section 2: Diagnosing the Exact Cause
Proper diagnosis is crucial for effective treatment. Follow these steps to identify what’s behind the black spots on your Peace Lily.
Cause 1: Fungal Infections (e.g., Botrytis, leaf spot fungi)
Signs: Small, round, black or brown spots with fuzzy or necrotic edges. These spots may enlarge over time, sometimes with a yellow halo around them. If the spots are spreading, fungal infection is likely. Diagnosis tip: Look for other signs like leaf fragility, fuzzy growth, or a musty smell. Fungal spots often appear after high humidity or overwatering.
Cause 2: Overwatering leading to root problems and leaf decay
Signs: Black spots may be accompanied by yellowing leaves, wilting, or soft, mushy stems. Roots may be brown or black and smell rotten if you inspect the root system. Diagnosis tip: Check the soil moisture. If the top inch of soil remains wet for too long, overwatering is the culprit.
Cause 3: Pest-related issues such as fungal gnats or micro-pests
Signs: Tiny pests visible on the leaves or soil surface, or small black flying insects (fungal gnats). Pests can cause leaf damage, leading to black spots or holes. Diagnosis tip: Inspect both the undersides of leaves and soil for pests or webbing.
How to tell which cause applies to your plant
- Fungal: Spots with fuzzy or necrotic edges, high humidity, and moist environment.
- Overwatering: Soft, yellowing leaves, root rot symptoms, and consistently wet soil.
- Pests: Visible insects, webbing, and physical damage on leaves.
Section 3: Treatment Solutions
Once you've identified the cause, you can implement targeted treatments.
Immediate actions to take: removing infected leaves, adjusting watering habits
- Carefully prune and remove all affected leaves with clean, sharp scissors.
- Discard infected foliage away from your home to prevent spreading.
- Adjust watering schedule—allow the soil to dry slightly between waterings, typically once the top inch feels dry.
Use of natural remedies like neem oil or hydrogen peroxide application
Neem oil: Dilute according to package instructions and spray on leaves to curb fungal growth and pests. Hydrogen peroxide: Mix one part hydrogen peroxide (3%) with two parts water; lightly spray onto leaf spots to disinfect surfaces.
Chemical treatments if necessary, with guidance on safe use
- Use fungicides labeled safe for indoor plants if fungal infections persist.
- Always follow product instructions carefully, and ensure good ventilation.
Long-term care: improving airflow, proper watering, and lighting adjustments
- Increase air circulation around your Peace Lily, perhaps with a small fan.
- Ensure it receives bright, indirect light for 12–14 hours a day.
- Maintain humidity at around 50-60% to support healthy growth.
- Avoid overcrowding your plants to promote airflow.
Monitoring recovery and signs of improvement
- Observe leaf spots diminishing in size or color.
- New leaves should grow healthy and free of black spots.
- Continually inspect your plant for early signs of trouble.
Section 4: Prevention Tips
Prevention is always better than cure. Here’s how to keep your Peace Lily healthy and free from black spots.
Adopt a balanced watering schedule and avoid overwatering
- Water only when the top inch of soil feels dry.
- Use pots with drainage holes to prevent water from accumulating.
Ensure adequate lighting and proper humidity levels
- Place your Peace Lily near bright, indirect sunlight.
- Use a humidifier or mist the leaves if indoor air is dry.
Maintain good airflow and avoid overcrowding
- Space your plants properly to allow air to circulate freely.
- Use fans if necessary to reduce humidity build-up.
Regular inspection for early pest or disease detection
- Check leaves and soil weekly for signs of pests or disease.
- Remove debris and fallen leaves to keep the environment clean.
Conclusion
Recap: The appearance of black spots on your Peace Lily signals potential issues like fungal infections, overwatering, low light, or pests. The key to healing your plant lies in accurate diagnosis and prompt, targeted treatment. With attentive care—pruning affected areas, adjusting watering and lighting, ensuring good airflow, and practicing prevention—you’ll help your Peace Lily recover and flourish once again. Remember, your plant's health depends on your observant and caring approach. Start by inspecting your plant carefully, apply the right treatment, and adopt preventive habits. Your Peace Lily has the resilience to bounce back, and with your nurturing, it can continue to brighten your indoor space for years to come.
Q: How long until I see improvement after treatment?
A: Typically, you can expect to see signs of recovery within 1 to 2 weeks. New, healthy leaves should start emerging, and existing spots may fade. Keep monitoring and continue your care routine.
Q: Will my Peace Lily fully recover from black spots?
A: Yes, if the underlying cause is properly addressed and the plant is cared for diligently, it can recover fully. However, severe or prolonged infections might cause some damage to the foliage, and you may need to prune more extensively.
Q: Should I prune or remove the affected leaves immediately?
A: Yes. Removing infected or damaged leaves as soon as possible prevents the spread of disease and encourages the plant to focus energy on healthy growth. Use sterilized scissors to avoid transmitting pathogens.
Your Peace Lily is a wonderful addition to your home. With patience, knowledge, and dedicated care, you can overcome black spots and enjoy a lush, vibrant plant once more!