Discover how to identify, treat, and prevent black spots on your Peace Lily with our simple, reassuring guide. Keep your plant healthy and vibrant!
Noticing black spots on your Peace Lily can be worrying, especially if you cherish this beautiful indoor plant. But don't worry—you're not alone, and with a little understanding and care, you can bring your plant back to health. This article will explain what causes the black spots, how to diagnose the issue precisely, and how to treat and prevent them effectively. With the right steps, your Peace Lily can recover and thrive again, brightening up your living space.
Section 1: Understanding the Problem
Visual Identification: What Do Black Spots Look Like?
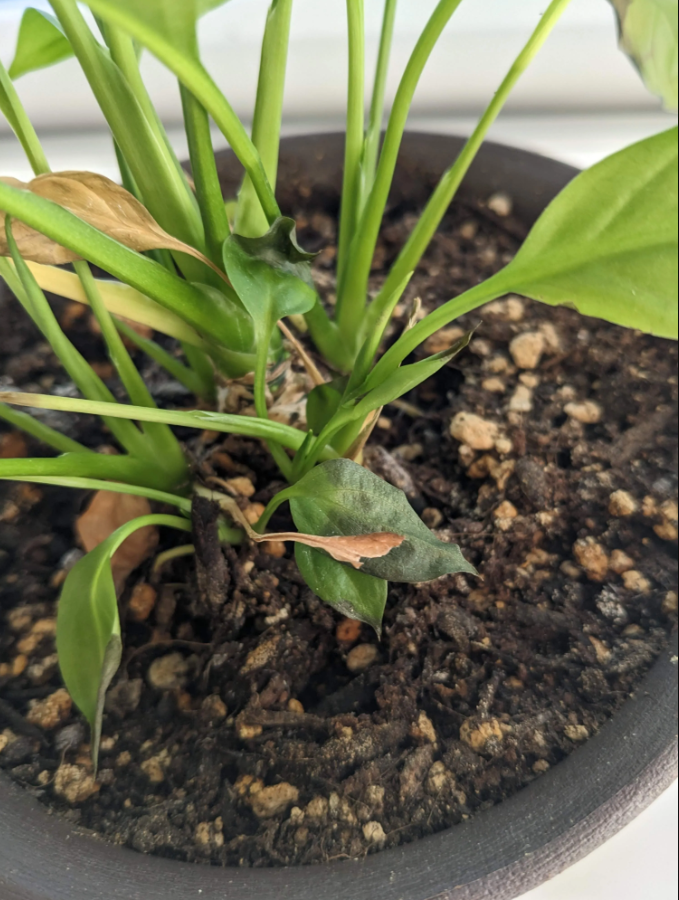
Black spots on Peace Lily leaves can appear as small, round, or irregular patches. They may be entirely black or have a dark brown hue with a slightly sunken texture. Sometimes, these spots spread or grow larger over time, turning the affected leaves yellow or brown and eventually causing leaf drop. Key points to recognize:
- Small, dark, sunken patches on leaf surfaces
- Spots may be surrounded by yellowing or browning tissue
- Affected leaves show signs of distress, such as wilting or curling
Common Causes Overview: Fungal Infection, Overwatering, or Low Humidity
Black spots on your Peace Lily usually result from one of these primary issues:
- Fungal infections, such as leaf spot fungi, thrive in moist, humid conditions.
- Overwatering can cause root rot and promote fungal growth, leading to blackening leaves.
- Low humidity and environmental stress can weaken the plant’s defenses, making it susceptible to disease. Understanding these causes is vital for effective treatment and prevention.
Section 2: Diagnosing the Exact Cause
Guide to Pinpoint What’s Causing the Black Spots with Diagnostic Steps
Accurate diagnosis ensures you choose the most effective treatment. Follow these steps:
Cause 1: Fungal Infections (e.g., Leaf Spot Fungi)
- Look for black or dark brown spots with defined borders.
- Spots may be dry or slightly sunken.
- The spots often appear on older leaves but can affect new growth.
Cause 2: Overwatering Leading to Root and Leaf Issues
- Check if the soil is consistently soggy or waterlogged.
- Roots may appear brown, mushy, or foul-smelling, indicating root rot.
- The black spots may be part of broader symptoms like wilting or yellowing.
Cause 3: Environmental Stressors Like Low Humidity or Water on Foliage
- Observe if water droplets sit on leaves long after watering.
- Indoor conditions with dry air (heating season, air conditioning) can stress your plant.
- Black spots may be less defined and accompanied by leaf curling or browning edges.
How to Tell Which One It Is: Practical Tips for Diagnosis
- Inspect under leaves for fungal spores or mold.
- Feel the soil for excessive moisture or dryness.
- Assess humidity levels with a hygrometer; below 40% indicates low humidity.
- Remove affected leaves carefully and examine the underside for pests or mold.
Section 3: Treatment Solutions
Immediate Actions: Removing Affected Leaves, Adjusting Watering Habits
Start by:
- Pruning: Remove and discard affected leaves to prevent the spread of infection.
- Adjust watering: Let the soil dry out slightly between waterings. Ensure you’re watering only when the top inch of soil feels dry.
- Improve drainage: Use well-draining soil and ensure pots have drainage holes.
Long-term Treatment Plan: Applying Natural Remedies and Improving Conditions
Depending on the identified cause:
- Fungal infections: Use natural fungicides like neem oil or a diluted copper-based fungicide. Apply as instructed on the label, targeting the infected areas.
- Prevent overwatering: Water less frequently, considering the plant’s needs, and avoid watering on leaves.
- Boost humidity: Place a humidifier nearby or set the pot on a pebble tray filled with water (but ensure the bottom of the pot doesn't sit directly in water).
What to Expect During Recovery: Timelines and Plant Care Tips
- Signs of improvement: New healthy growth and the reduction of black spots within 2-4 weeks.
- Patience is key: Healthy soil, proper watering, and environment improve recovery chances.
- Keep monitoring: Regularly inspect for early signs to prevent recurrence.
Section 4: Prevention Tips
How to Avoid Black Spots in the Future and Promote Healthy Growth
- Maintain proper watering routines: Always check soil moisture before watering. Water thoroughly but infrequently.
- Avoid water sitting on leaves: Water at the base and wipe leaves gently if water droplets remain.
- Ensure adequate air circulation and humidity levels: Use fans or humidifiers to create a balanced environment.
- Regularly inspect for early signs of disease and pests: Being proactive helps catch problems early before they become severe.
Conclusion
Summary
Black spots on your Peace Lily can stem from fungal infections, overwatering, or environmental stress. By understanding these causes and following recommended care practices—like pruning affected leaves, adjusting watering habits, and improving humidity—you can effectively treat the issue. Regular inspections and preventive measures will help keep your plant healthy and vibrant.
Encouragement
Remember, most issues with Peace Lilies are manageable. With a little attention and gentle care, your plant can recover beautifully, providing you with years of lush greenery.
Next Steps
Start diagnosing the black spots today—carefully examine your Peace Lily, adjust your watering routine, and consider environmental improvements. Soon, you'll enjoy a thriving, healthy plant that brightens your home!
FAQ
Q: How long until I see improvement after treatment?
A: Typically, you can expect to notice new healthy growth and a reduction in black spots within 2 to 4 weeks, provided you follow the treatment plan consistently. Patience and regular care are essential.
Q: Can my Peace Lily fully recover from black spots?
A: Yes, many Peace Lilies recover completely if the cause is correctly identified and treated early. Persistent issues might require ongoing management, but with careful attention, your plant can bounce back.
Q: Should I prune the affected leaves immediately?
A: Yes. Removing infected or severely damaged leaves helps prevent the spread of fungal or bacterial infections and encourages healthy new growth. Use clean, sharp scissors or pruning shears to make clean cuts.
Take action today to diagnose, treat, and prevent black spots on your Peace Lily. Your plant's health and beauty depend on your care—happy gardening!