Introduction
Noticing your peace lily's leaves drooping or turning yellow? Root rot could be the culprit, but don’t worry—it’s a common issue faced by many indoor plant lovers, and it's often fixable with the right approach. This guide will help you identify the signs of root rot, diagnose its causes, implement effective treatments, and adopt preventive measures to keep your peace lily healthy and thriving. With patience and proper care, your beloved plant can recover and continue to bring beauty to your home.
Section 1: Understanding the Problem
Recognize the Symptoms of Root Rot in Your Peace Lily
The first step to fixing peace lily root rot is understanding how it manifests:
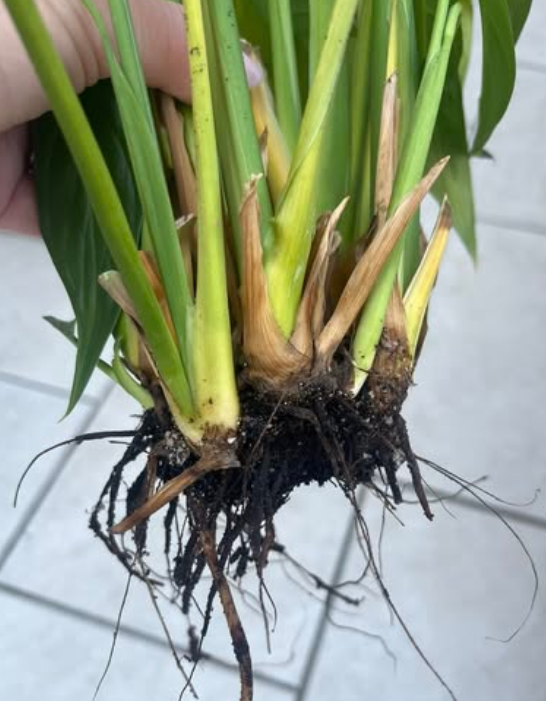
- Mushy, Black Roots: When you gently remove your plant from its pot, inspect the roots. Healthy roots are firm and white or light tan. Black, brown, or mushy roots indicate rot.
- Yellow or Drooping Leaves: Over time, root rot hampers nutrient and water absorption, causing leaves to turn yellow, wilt, or droop even if the soil appears moist.
- Foul Smell: A decaying, rotten odor emanating from the soil or roots signals bacterial or fungal growth associated with root rot.
Common Causes Overview
Root rot in peace lilies typically results from factors like:
- Overwatering: Excess water saturates the soil, preventing roots from getting oxygen.
- Poor Drainage: Improper pot drainage traps moisture around roots.
- Stressed or Damaged Roots: Damage from repotting or handling makes roots vulnerable.
- Soil Disease: Contaminated soil can harbor pathogens that cause rot. Understanding these causes helps you adapt your care routine and prevent future problems.
Section 2: Diagnosing the Exact Cause
Follow a Step-by-Step Process to Confirm Root Rot and Identify Underlying Factors
Before treatment, precise diagnosis is crucial:
Cause 1: Overwatering Leading to Waterlogged Soil
- Check if the top inch of soil feels consistently wet.
- Notice if the plant has been watered too frequently without allowing soil to dry out.
Cause 2: Poor Drainage or Compact Soil Preventing Oxygen Flow
- Examine if the pot has drainage holes.
- Remove the plant and inspect the roots for softness, discoloration, or a foul smell.
Cause 3: Root Injury or Stress from Repotting
- Think about recent repotting or handling, which could have damaged roots.
- Look out for excess moisture in soil caused by improper watering after transplanting.
How to Tell Which One It Is:
- Check Roots: Gently remove the plant from the pot and examine root health.
- Test Soil Moisture: Use your finger or a moisture meter to assess soil dampness.
- Inspect Pot Condition: Ensure the pot has adequate drainage and is clean. By systematically evaluating these factors, you'll pinpoint the exact cause, allowing targeted treatment.
Section 3: Treatment Solutions
Apply Targeted Remedies Based on the Diagnosed Cause
Once you've identified the root rot cause, follow these steps:
Immediate Actions to Take
- Remove Affected Roots: Use sterilized scissors or pruning shears to cut away mushy, blackened roots. Dispose of infected material.
- Adjust Watering Habits: Let the soil dry out before watering again, and avoid overwatering.
- Disinfect Tools: Clean cutting tools with alcohol or bleach to prevent spreading pathogens.
Long-term Treatment Plan
- Repot in Well-Draining Soil: Choose a high-quality, airy mix designed for peace lilies—often a combination of peat, perlite, and orchid bark.
- Ensure Proper Watering Routine: Water only when the top inch of soil feels dry, typically once a week.
- Use Natural Remedies: A diluted hydrogen peroxide solution (1 part per 4 parts water) can help disinfect roots and promote oxygenation when applied during repotting.
- Maintain Good Drainage: Always use a pot with drainage holes and avoid letting the plant sit in standing water.
What to Expect During Recovery
- Gradual Root Regeneration: New healthy roots will develop over several weeks.
- Leaf Revival: Expect leaves to begin to perk up as root function improves.
- Patience Needed: Recovery can take time—avoid overwatering or disturbing the plant frequently.
Section 4: Prevention Tips
Implement Preventive Measures to Keep Root Rot at Bay
Prevention is better than cure! Here are effective tips:
Care Routine Adjustments
- Proper Watering Schedule: Always check soil moisture before watering; avoid watering on a fixed schedule.
- Avoid Over-fertilizing: Excess fertilizer can lead to salt buildup, stressing roots and encouraging rot.
Environmental Factors
- Ensure Good Drainage: Use pots with drainage holes and avoid water-retentive containers.
- Select Appropriate Soil Mix: Use fast-draining, airy soil suitable for peace lilies.
- Monitor Watering Frequency: Adjust based on humidity, season, and soil moisture to prevent overwatering. Consistently applying these tips will help maintain a healthy root environment, reducing the risk of future root rot.
Conclusion
Recap the Importance of Handling Root Rot Early
Detecting and addressing root rot early is key to saving your peace lily. Proper diagnosis, targeted treatment, and optimal watering practices will enable your plant to recover fully.
Encouragement
Remember, with patience and attentive care, your peace lily can bounce back and flourish once again. Don't be discouraged—every plant parent faces challenges, and each one is an opportunity to become a more confident and knowledgeable gardener.
Next Steps
- Regularly check your plant for signs of stress.
- Adjust watering habits based on season and soil moisture.
- Consider repotting if the soil or pot condition has deteriorated.
- Keep nurturing your peace lily with love and attentive care.
FAQ
Q: How long until I see improvement after treating root rot?
A: Usually, noticeable improvement occurs within 2 to 4 weeks. You may see new root growth and the leaves returning to a healthier color and firmness. Patience and consistent care are essential.
Q: Will my peace lily fully recover from severe root damage?
A: With proper treatment and care, many peace lilies can recover from significant root damage. However, success depends on the extent of the damage; severely compromised roots may limit growth but still allow for improved health over time.
Q: Should I prune all affected roots or only some parts?
A: It's best to prune only the mushy, discolored roots, leaving healthy tissue intact. Use sterilized tools and cut just above the healthy tissue to promote new growth and prevent infection spread.
By understanding the causes of root rot, following precise diagnosis steps, and applying targeted treatments, you’re well on your way to restoring your peace lily to its full beauty. Happy gardening!