Learn how to identify, diagnose, and treat black spots on your spider plant with practical tips to restore health and prevent future issues. Easy solutions inside!
Introduction
Black spots on your beloved spider plant can be worrying, but don’t fret—most issues are fixable with simple care adjustments. Whether you’ve just noticed those dark patches or they’ve been there for a while, understanding what causes black spots and knowing how to treat them is key to bringing your plant back to life. This guide will help you identify, diagnose, and treat black spots on your spider plant, as well as provide tips on preventing them in the future. With patience and proper care, your spider plant can recover and thrive again—so let’s get started!
Section 1: Understanding the Problem
Visual identification of black spots: their appearance, location, and texture
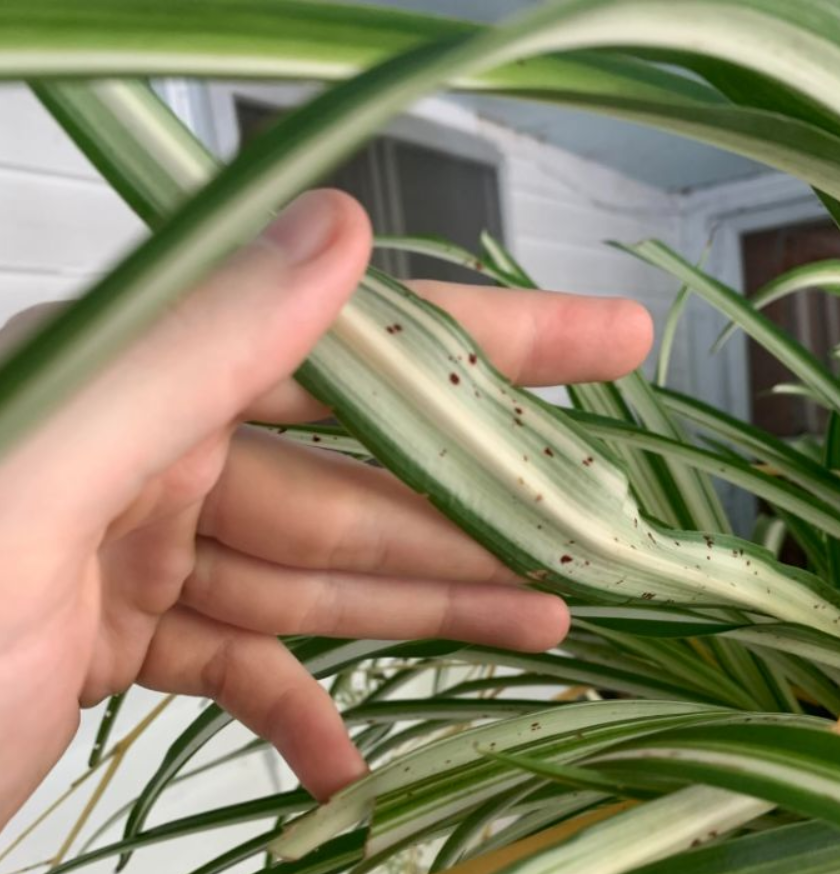
Black spots on your spider plant typically appear as small, dark, irregular patches on the leaves. They can vary in size from tiny dots to large, spreading patches. Common characteristics include:
- Color: Deep black or dark brown.
- Location: Usually along the leaf edges, tips, or scattered randomly across the leaf surface.
- Texture: Some spots are soft and sunken, indicating rot, while others may be slightly raised or crusty if fungal or pest-related.
Common causes overview: overwatering, fungal infections, nutrient deficiencies, or pest issues
Understanding the potential causes is essential in choosing the right treatment:
- Overwatering: Excess moisture can lead to root rot, which shows up as black spots or patches.
- Fungal infections: Leaf spot fungi or other pathogens cause dark, often circular or irregular spots.
- Nutrient deficiencies: Lack of essential minerals can weaken the plant’s defenses, making it susceptible.
- Pest damage: Bugs like spider mites or scale can cause physical injury or introduce disease, resulting in black markings.
Section 2: Diagnosing the Exact Cause
Follow a step-by-step diagnostic to determine the root cause of black spots on your spider plant
Identifying the precise cause will guide effective treatment. Here’s what to check:
Cause 1: Fungal infections, such as leaf spot fungi
Signs:
- Circular black or dark brown spots with well-defined edges.
- Spots may enlarge and merge over time.
-
Surrounding tissue may yellow or wilt. Testing hints:
-
Inspect for fuzzy or moldy growth.
- Check if spots are spreading rapidly.
Cause 2: Overwatering leading to root and leaf rot
Signs:
- Soft, translucent, or blackened roots when you gently unwrap the plant.
- Leaves with black patches, often starting at the base and moving upward.
-
Soil remains constantly moist. Testing hints:
-
Smell of musty or foul odor from the soil indicates rot.
- Roots are mushy and discolored.
Cause 3: Pest damage or physical injury
Signs:
- Small black specks may be insects or their excrement.
-
Physical damage like tears or wounds, which can develop into black, necrotic patches. Testing hints:
-
Look under leaves and along stems.
- Use a magnifying glass to spot tiny pests.
How to tell which cause is affecting your plant: signs and testing hints
Compare your observations with these clues:
- Are the spots spreading quickly and have fuzzy edges? Likely fungal.
- Is the soil wet and roots looking rotten? Overwatering is probable.
- Are there pests or physical injuries? Pests or physical damage are likely causes.
Section 3: Treatment Solutions
Implement targeted fixes based on the diagnosed cause
Once you’ve identified the culprit, follow these actionable steps:
Immediate actions:
- Remove affected leaves: Use clean, sharp scissors or pruning shears to cut away blackened or rotting leaves. Dispose of these parts immediately to prevent spread.
- Adjust watering habits: If overwatering is suspected, allow the soil to dry out completely before watering again. Ensure your pot has proper drainage.
- Apply fungicide or natural remedies: For fungal spots, treat with a copper-based fungicide or natural alternatives like neem oil, which has antifungal properties.
Long-term treatment plan:
- Improve airflow: Keep your spider plant in a well-ventilated area to discourage fungal growth.
- Sterilize tools: Always disinfect pruning tools with alcohol before use.
- Balance watering schedule: Water only when the top inch of soil feels dry.
- Fertilization: Use a balanced, water-soluble houseplant fertilizer during the growing season to strengthen your plant.
What to expect during recovery:
- New, healthy leaves should start to develop within a few weeks.
- Regular monitoring and prompt removal of affected leaves are crucial.
- Keep an eye on humidity and lighting to ensure optimal growth conditions.
Section 4: Prevention Tips
Prevent future black spots with proactive care practices
Prevention is always better than cure. Here’s how to keep your spider plant healthy and resilient:
Adjusting care routine:
- Proper watering: Avoid overwatering; let the soil dry out between watering sessions.
- Fertilization: Feed your spider plant monthly during the growing season with a diluted balanced fertilizer.
- Pruning: Regularly prune dead or yellowing leaves to promote healthy growth and reduce disease risk.
Monitoring environmental factors:
- Humidity and airflow: Keep the plant in a well-ventilated space with moderate humidity.
- Sunlight exposure: Bright, indirect sunlight helps strengthen the plant and ward off pathogens.
- Pot and soil health: Use sterile, well-draining soil and pots with drainage holes to prevent waterlogging.
Conclusion
Summary of identification, diagnosis, treatment, and prevention strategies for black spots on your spider plant
Black spots on your spider plant can be caused by various issues like fungal infections, overwatering, pests, or injuries. Properly identifying the cause is crucial in choosing the right treatment—whether it’s pruning, adjusting watering habits, applying fungicides, or controlling pests.
Remember, most issues are manageable, and with consistent care, your plant will bounce back.
Next steps:
Apply the recommended treatments today, keep a close eye on your plant’s progress, and adopt preventive care practices. With patience and attention, your spider plant can regain its vibrant, healthy appearance.
FAQ
Q: How long until I see improvement after treatment?
A: Usually, you can expect to see new healthy growth within 2 to 4 weeks after effective treatment. Keep monitoring your plant closely and remove any new black spots as they appear.
Q: Will my plant fully recover from black spots?
A: Most healthy spider plants can recover fully if the root cause is addressed promptly. Older or severely damaged leaves may not recover, but new growth will typically be healthy and free of black spots.
Q: Should I prune all the affected leaves or only some?
A: It’s best to prune only the leaves with visible black spots or damage. Removing severely affected parts helps prevent disease spread and encourages healthy new growth.
By following these steps, you’ll be equipped to effectively fix black spots on your spider plant and ensure its continued health and beauty. Happy gardening!